Dec
31
2009
Greg
 I’d been toying with the idea of a rock tumbler for some 18 months, but was finding it difficult to justify the outlay. To cut a long story short, my mum got me one for xmas and for the last 4 days its been churning away in my shed.
So far the results are looking promising, this batch is going back in for another 4 days with 80 grit. After that it gets tumbled for a week at progressivly finer grits before at least a week of polishing.
For more about rock tumbling, an excellent guide can be found here.
no comments | tags: Rock Tumbling, shed
Dec
30
2009
Owen
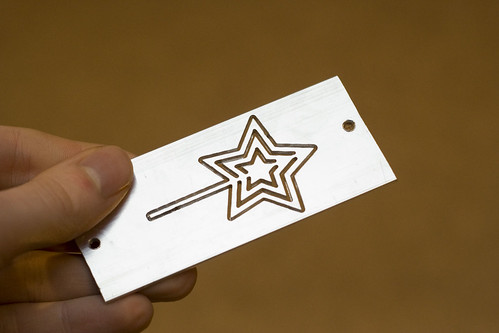
Using my little CNC machine I knocked up this little star to go on the top of our Christmas tree. It was cut from a piece of 2mm x 40mm aluminium stock using a 2 flute 1mm end mill. The pic above shows it still held in place in the stock by 2 small tabs I added to the outline toolpath.

Here’s the star popped out and given a bit of a polish.

Finally, it’s in place on the top of our tree.
2 comments | tags: christmas, CNC, decoration | posted in CNC
Dec
2
2009
Greg
Parts List
- A Photo, drawing or idea
- Lego lots of
- more Lego
- Time
Step One – convince the NLSO (Non Lego significant other)
I’d wanted to make a Lego mosaic for some time, but lacked suitable Inspiration. Nine months later and inspiration hit in the form of my new born daughter, Ffion Carys.
When Ffion was about 4 months old, I started the mosaic. It took a while to convince Lou (my fiancée) that this was a good idea and worth the money. She was up for a mosaic, but only a small one, I wanted a big one (don’t we all?). Anyway the 2 images to the right convinced her, one is a single Lego baseboard (48*48) the other is 4 baseboards (96*96).
I found a suitable picture of Ffion that my brother had taken when she was about 3 months old, a bit of tweaking was needed, just to straighten it up a bit.
I reduced the image to 90 *90 pixels (giving me a 3 pixel border) and reduced the colours to a close approximation of the Lego bricks I was planning on using ( Black, Drk Grey, Light Grey and white).
So far so good, once I had the image at the right size and colour, I used a program called Bricksaic to generate the plans. Bricksaic does a lot more than just generate the plans. It can do all the parts I did in photoshop, but I preferred to have the extra control over the image.
The Plans also gave me a piece count. About 8000. ouch!
This is the point at which I made a mistake, I generated the plans without the border on, so all my plans were shifted 6 studs up and left. I wouldn’t find this out till some time later when I had the parts and the plans printed. Continue reading
no comments | tags: lego