Aug
8
2011
Greg

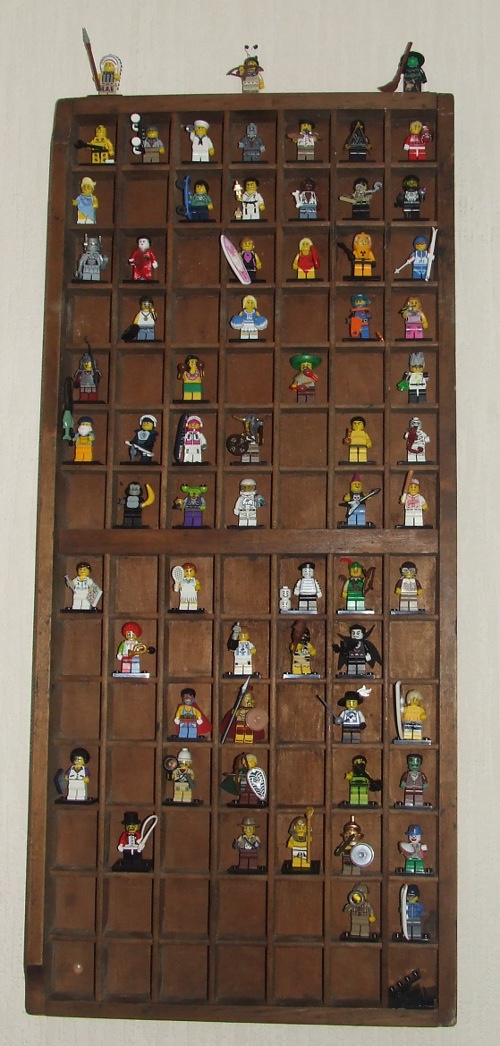
I’m really enjoying Lego’s collectible minifig series, but they’re beginning to over flow the top of my book shelf, time to give them a more suitable home.
This is the second print block drawer that i have for displaying Lego figures. I put the first one up several years ago, it houses some of the classic space and castle figures form my childhood, along with some of the newer licensed characters. This one however was bought with the sole purpose of displaying the collectible minifig line.
There are plenty of these on ebay, they make great display frames for anything you can fit in them. The one above has nice regular openings, but others are more varied. This one will keep all the minfigs up to series 6 neatly arranged and adds a bit of character to my dining room wall.
no comments | tags: lego, minifigure, recycle
Dec
2
2009
Greg
Parts List
- A Photo, drawing or idea
- Lego lots of
- more Lego
- Time
Step One – convince the NLSO (Non Lego significant other)
I’d wanted to make a Lego mosaic for some time, but lacked suitable Inspiration. Nine months later and inspiration hit in the form of my new born daughter, Ffion Carys.
When Ffion was about 4 months old, I started the mosaic. It took a while to convince Lou (my fiancée) that this was a good idea and worth the money. She was up for a mosaic, but only a small one, I wanted a big one (don’t we all?). Anyway the 2 images to the right convinced her, one is a single Lego baseboard (48*48) the other is 4 baseboards (96*96).
I found a suitable picture of Ffion that my brother had taken when she was about 3 months old, a bit of tweaking was needed, just to straighten it up a bit.
I reduced the image to 90 *90 pixels (giving me a 3 pixel border) and reduced the colours to a close approximation of the Lego bricks I was planning on using ( Black, Drk Grey, Light Grey and white).
So far so good, once I had the image at the right size and colour, I used a program called Bricksaic to generate the plans. Bricksaic does a lot more than just generate the plans. It can do all the parts I did in photoshop, but I preferred to have the extra control over the image.
The Plans also gave me a piece count. About 8000. ouch!
This is the point at which I made a mistake, I generated the plans without the border on, so all my plans were shifted 6 studs up and left. I wouldn’t find this out till some time later when I had the parts and the plans printed. Continue reading
no comments | tags: lego
