I’ve begun some experiments in mushroom growing recently. My first step is trying to clone supermarket bought gourmet mushrooms, such as Oyster and Shiitake.
The main motivation behind this started out as an effort to save money, but as is often the case with these things, I’ll probably end up spending way more than I can hope to save on various bits of equipment and massive cock-ups. Either way, I’ll be documenting my progress here.
This Display, based on my previous mini Dino gardens, materialised over the past weekend. We’re all big fans of Dr Who in my household. My daughter knew of Daleks and Tardi (i assume that’s the plural- edit: obviously it isn’t, that’d be crazy) from a very early age.
Back to the project, as before, the base is an 80mm saucer that cost 25p from a DIY shop, the landscape is polymer clay, work in progress shots available here and here. Finally it was painted in acrylics and finished with model railway scatter material.
To hide the gap between the base of the Tardis and the ground I glued a layer of grass around its base, allowing it to be positioned anywhere on the display
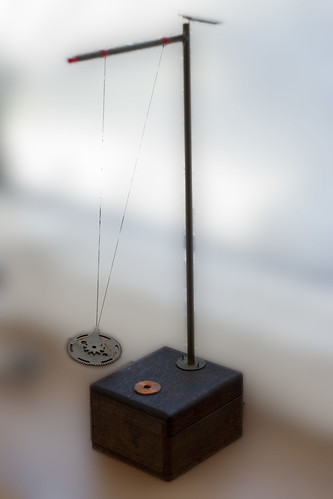
A little solar powered pendulum that I made a few years back. It uses a very simple circuit with just 2 transistors, a couple of resistors, a diode and some capacitors. Power is supplied by a two calculator solar panels wired in parallel for faster charging. The power is dumped into a coil which repels a magnet (disguised by some old brass gears) hanging from some fishing line. As the magnet swings back towards the coil the EMF generated lights a red LED in the top post and the power from the capacitors is dumped into the coil again giving the pendulum a little kick, forcing it higher.
Video, more pics and the schematic after the jump.
The base is from a mini Zen garden set, the sort they sell in bookshops.
The base is fimo (soft), prodded with a 3.5mm stereo jack and painted in acrylics. The bushes are standard model railway stuff.
This started out as 3 separate projects (use the base, dinosaurs and alien terrain) but pretty quickly merged into one. the Dino zen garden now sits on my desk.
I wanted to try and make driftwood after seeing some driftwood frames in a local shop. I couldn’t find any information on tumbling wood, so i went ahead and chucked a few pine off cuts in with some glass. I was pretty amazed by the results, much better than I expected.
The tumbler has been going for 3 months. I check it weekly to oil the rollers and to swap the contents out (or not as is often the case). I learnt very early on to avoid getting oil on the belt, this causes the motor to spin, but the barrels pretty much just sit there for a week not moving.
The barrels tend to leak slightly, and leave a dusty white powder everywhere, but this doesn’t cause any real problems. One barrel even managed to fall off at some point between my weekly checks.
I have at least 2 projects planned for the glass and wood, but its a case of waiting for enough to be produced.
As it’s Valentines day next week, it seems like a good time to post this project from 2008.
Partly inspired by Meredith Scheff’s travel journal this formed the casing for my ‘and finally’ present for my fiancée for Xmas 08. Inside the book is a hollowed section, inside that a purple felt purse, inside that, a sparkly bracelet (the actual present). Continue reading
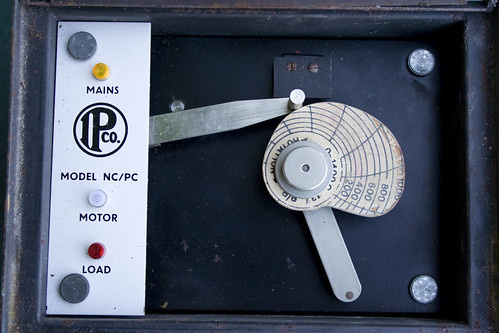
Very luckily I came into possession of a free electric kiln. It came with an old temperature control unit that I’ve decided to get back into working order so I can fire my own ceramics. The controller is made by the Industrial Pyrometer Company, which now seems to have become Mitsco. It uses a clever cam-follower system to regulate the kiln temperature and heating rate. The cam wheel has a scale laid out on it with the rings corresponding to 100C increases and the radial bands equaling 2 hour periods (a full rotation takes 24 hours). A sprung arm follows the edge of this cam around and through a system of gears, rotates a potentiometer inside the unit. An R-type thermocouple probe is used to monitor the temperature inside the kiln providing feedback to the control unit, which is compared to the cam-follower position using a simple Op Amp circuit (based on an F709PC chip). A relay is then triggered to turn the kiln on or off.
Today I’ve modified two of my servos to allow access to the output of the variable resistor inside them. This very simple modification opens up a world of possibilities that really should come as standard on all servos. All that’s involved is opening your servo, locating the potentiometer that provides feedback on where the output shaft is and then adding an extra wire onto the center tap. After adding this wire you can read the voltage present using an A/D converter and following some simple calibration, know quite precisely what angle the output shaft is at.
The actual modification is discussed in detail over at Trossen Robotics so I won’t go into that too much.
Here’s a video of what I cooked up using the newly modified servos and an arduino board.
You can see that as I twist the horn of one servo, the other rotates to match it and mirrors the movement very closely. To do this the value from the feedback pot is read using the analogRead() function. As the output of the feedback line only reaches around 2 Volts at maximum (and goes down to around 0.2V at the other end of travel) the AREF pin of the arduino must have a voltage just above this applied to get good A/D resolution.
To scale the A/D readings I connected a simple voltage divider between GND, +5V and the AREF pin. A note here is that when I measured the maximum output from the feedback pot without the servo being connected to the arduino I measured 1.2V for one and 1.3V for the other and made my divider to output around 1.37V. However, when I connected the ground from the servos to the ground of the arduino board, the voltage seen at the outputs moved closer to 2V, which messed up my readings and meant that the A/D converter was reporting a value of 1023 (max) at about a quarter of a rotation of the servo. This was down to the fact that I was using a separate power supply for the servos which was obviously mismatched slightly from the arduino board voltage. So make sure you hook everything together before you measure the servo voltage and work out which resistors to use in your divider. Incidentally, I used values of 5.1Kohms and 4.7Kohms, worked out using this calculator.
The code I used on the arduino was largely based around the example on the Trossen Robotics page. It’s available to download below.
I made this after becoming fascinated with the dry brushing technique used by modellers. Made using fimo, cling film (to mold the base of the original dock), a rock and knife for texturing and some old coins for a bit of weight.
My original idea was to have tiny N or HO scale people worshipping it, sort of like the 2001: A Space Odyssey Monolith. That never happened, as i was pretty happy with just the rock effect.